Distributed execution flow paradigms
In this age of cloud development and microservices architecture, problems start to arise with the increased workloads that run in the system. Imagine an e-commerce platform where a customer places an order for a product during a high-demand sale event. The order triggers a series of interconnected processes: payment processing, inventory checks, packaging, shipping, and final delivery. Each of these processes might be handled by different microservices, potentially running on different servers or even in different data centers. What happens if the payment service goes down right after the payment is authorized but before the inventory is updated? Or if the packaging service fails just after the inventory is deducted but before the item is packed? Without a robust mechanism to ensure that each step in the workflow completes successfully and that failures are properly handled, you could end up with unhappy customers, lost orders, and inventory discrepancies.
Having multiple components in your system introduces more failure points, which is a common phenomenon in complex systems. But one important behavior any application must ensure is that the execution flow reaches its completion. As systems grow in features and complexity, the likelihood of long-running processes increases. To ensure these processes complete as intended, several solutions have been introduced over the last few decades. Let's explore some of the solutions that have been proposed to achieve workflow completeness.
1. Event-Driven Architecture with Message Queues
This architecture relies heavily on services communicating by publishing and subscribing to events using message queues. Message queues are persistent storages that ensure data is not lost during failures or service unavailability. Components in a distributed system synchronize by using events/messages through these independent services. While this approach offers service decomposability and fault tolerance, it has some shortcomings. For example, using message queues comes with the overhead of managing messages (e.g., deduplication and message ordering). It also isn’t ideal for systems requiring immediate consistency across components. Some technologies and patterns that utilize this architecture include:

Fig. Event Driven Architecture with Message Queues - RabbitMQ
Advantages
- Improved Scalability
- Enhanced Responsiveness
- Enhanced Fault Tolerance
- Simplified Complex Workflows
- Real-Time Data Processing
Challenges
- Event Ordering
- Data Consistency
- Monitoring and Debugging
- Event Deduplication
You can mitigate or reduce these challenges by following best practices like Event Sourcing, Idempotent Processing, CQRS (Command Query Responsibility Segregation), and Event Versioning.
2. The Saga Pattern
This design pattern aims to achieve consistency across different services in a distributed system by breaking complex transactions spanning multiple components into a series of local transactions. Each of these transactions triggers an event or message that starts the next transaction in the sequence. If any local transaction fails to complete, a series of compensating actions roll back the effects of preceding transactions. While the orchestration of local transactions can vary, the pattern aims to achieve consistency in a microservices-based system. Events are designed to be stored in durable storage systems or logs, providing a trail to reconstruct the system to a state after a failure. While the saga pattern is an effective way to ensure consistency, it can be challenging to implement timer/timeout-based workflows and to design and implement the compensating actions for local transactions.
Note: In the Saga pattern, a compensating transaction must be idempotent and retryable. These principles ensure that transactions can be managed without manual intervention.

Fig. The Saga Pattern for Order delivery system
Advantages
- Ensures data consistency in a distributed system without tight coupling.
- Provides Roll back if one of the operations in the sequence fails.
Drawbacks
- Might be challenging to implement initially.
- Hard to debug.
- Compensating transactions don’t always work.
3. Stateful Orchestrators
Stateful orchestrators provide a solution for long-running workflows by maintaining the state of each step in a workflow. Each step in a workflow represents a task, and these tasks are represented as states inside workflows. Workflows are defined as state machines or directed acyclic graphs (DAGs). In this approach, an orchestrator handles task execution order, transitioning, handling retries, and maintaining state. In the event of a failure, the system can recover from the persisted state. Stateful orchestrators offer significant value in fault tolerance, consistency, and observability. It’s one of the solutions proven effective in modern distributed computing. Some well-known services that provide this solution include:
Advantages
- High Resiliency: Stateful orchestrators provide high resiliency in case of outages, ensuring that workflows can continue from where they left off.
- Data Persistence: They allow you to keep, review, or reference data from previous events, which is useful for long-running processes.
- Extended Runtime: Stateful workflows can continue running for much longer than stateless workflows, making them suitable for complex and long-running tasks.
Challenges
- Additional Complexity: They introduce additional complexity, requiring you to manage issues such as load balancing, CPU and memory usage, and networking.
- Cost: With stateful workflows, you pay for the VMs that are running in the cluster, whereas with stateless workflows, you pay only for the actual compute resources consumed.
4. Durable Execution
Durable execution refers to the ability of a system to preserve the state of an application and persist execution despite failures or interruptions. Durable execution ensures that for every task, its inputs, outputs, call stack, and local variables are persisted. These constraints, or rather features, allow a system to automatically retry or continue running in the face of infrastructure or system failures, ultimately ensuring completion.
Durable execution isn’t a completely distinct solution from the ones listed above but rather incorporates some of their strengths while presenting a more comprehensive approach to achieving consistency, fault tolerance, data integrity, resilience for long-running processes, and observability.

Advantages
- Reduced Manual Intervention: Minimizes the need for human intervention by handling retries and failures programmatically.
- Improved Observability: Provides a clear audit trail and visibility into the state of workflows, which aids in debugging and monitoring.
- Scalability: Scales efficiently across distributed systems while maintaining workflow integrity.
Challenges
- Resource Intensive: Persistent state storage and management can consume significant resources, especially in large-scale systems.
- Latency: The need to persist state and handle retries can introduce latency in the execution flow.
As durable execution grows to be a fundamental driver of distributed computing, some of the solutions which use this architecture are
Among these, Temporal has grown in influence, used by companies like SnapChat, HashiCorp, Stripe, DoorDash, and DataDog. Its success is driven by its practical application in real-world scenarios and the expertise of its founders.
At Metatype, we recognize the value of durable execution and are committed to making it accessible. Our Temporal Runtime integrates seamlessly into our declarative API development platform, enabling users to harness the power of Temporal directly within Metatype. For those interested in exploring further, our documentation provides a detailed guide on getting started with Temporal Runtime.
Below is an example of how you can build a simple API to interact with an order delivery temporal workflow within Metatype.
If you are new to Metatype or haven’t set it up yet in your development environment. You can follow this guideline.
For this example, the order delivery system will have few components/services such as Payment, Inventory and Delivery.
Your temporal workflow definition should look similar to the one below.
Activities definition inside src/activities.ts:`
async function sleep(time: number) {
  return new Promise((resolve) => {
    setTimeout(resolve, time);
  });
}

export async function processPayment(orderId: string): Promise<string> {
  console.log(`Processing payment for order ${orderId}`);
  // Simulate payment processing logic
  await sleep(2);
  return "Payment processed";
}

export async function checkInventory(orderId: string): Promise<string> {
  console.log(`Checking inventory for order ${orderId}`);
  // Simulate inventory check logic
  await sleep(2);
  return "Inventory available";
}

export async function deliverOrder(orderId: string): Promise<string> {
  console.log(`Delivering order ${orderId}`);
  // Simulate delivery logic
  await sleep(5);
  return "Order delivered";
}
Workflow definition inside src/workflows.ts:
export const { processPayment, checkInventory, deliverOrder } =
  proxyActivities<{
    processPayment(orderId: string): Promise<string>;
    checkInventory(orderId: string): Promise<string>;
    deliverOrder(orderId: string): Promise<string>;
  }>({
    startToCloseTimeout: "10 seconds",
  });

export async function OrderWorkflow(orderId: string): Promise<string> {
  const paymentResult = await processPayment(orderId);
  const inventoryResult = await checkInventory(orderId);
  const deliveryResult = await deliverOrder(orderId);
  return `Order ${orderId} completed with results: ${paymentResult}, ${inventoryResult}, ${deliveryResult}`;
}
Worker definintion inside src/worker.ts:
import { NativeConnection, Worker } from "@temporalio/worker";
import * as activities from "./activities";
import { TASK_QUEUE_NAME } from "./shared";

async function run() {
  const connection = await NativeConnection.connect({
    address: "localhost:7233",
  });

  const worker = await Worker.create({
    connection,
    namespace: "default",
    taskQueue: TASK_QUEUE_NAME,
    workflowsPath: require.resolve("./workflows"),
    activities,
  });

  await worker.run();
}

run().catch((err) => {
  console.error(err);
  process.exit(1);
});
After you have setup the above components, now you need a client to start of any OrderWorkflow. Here is where metatype comes in, through the simple APIs Temporal Runtime exposes, you can communicate with your temporal cluster.
Down below is the workflow communication bridge for this system expressed within a typegraph which includes endpoints to start a new workflow and describe an existing one.
import { Policy, t, typegraph } from "@typegraph/sdk/index.ts";
import { TemporalRuntime } from "@typegraph/sdk/providers/temporal.ts";

typegraph(
  {
    name: "order_delivery",
  },
  (g: any) => {
    const pub = Policy.public();

    const temporal = new TemporalRuntime({
      name: "order_delivery",
      hostSecret: "HOST",
      namespaceSecret: "NAMESPACE",
    });

    const workflow_id = "order-delivery-1";

    const order_id = t.string();

    g.expose(
      {
        start: temporal.startWorkflow("OrderWorkflow", order_id),
        describe: workflow_id
          ? temporal.describeWorkflow().reduce({ workflow_id })
          : temporal.describeWorkflow(),
      },
      pub,
    );
  },
);
You need to add the secrets HOST and NAMESPACE under your typegraph name inside the metatype.yaml file. These secrets are important to connect with your temporal cluster and can be safely stored in the config file as shown below.
metatype.yaml
typegate:
  dev:
    url: "http://localhost:7890"
    username: admin
    password: password
    secrets:
      example:
        POSTGRES: "postgresql://postgres:password@postgres:5432/db"
        HOST: "http://localhost:7233"
        NAMESPACE: "default"
You need to add only the last two lines as the others are auto-generated. Note that secrets are defined under the example parent, which is the name of your typegraph. If the name doesn't match, you will face secret not found issues when deploying your typegraph.
Before deploying the above typegraph, you need to start the temporal server and the worker. You need to have temporal installed on your machine.
Boot up temporal
Start the temporal server.
temporal server start-dev
Start the worker.
typescript npx ts-node src/worker.ts
After booting the temporal server, run the command down below to get a locally spinning typegate instance with your typegraph deployed.
meta dev
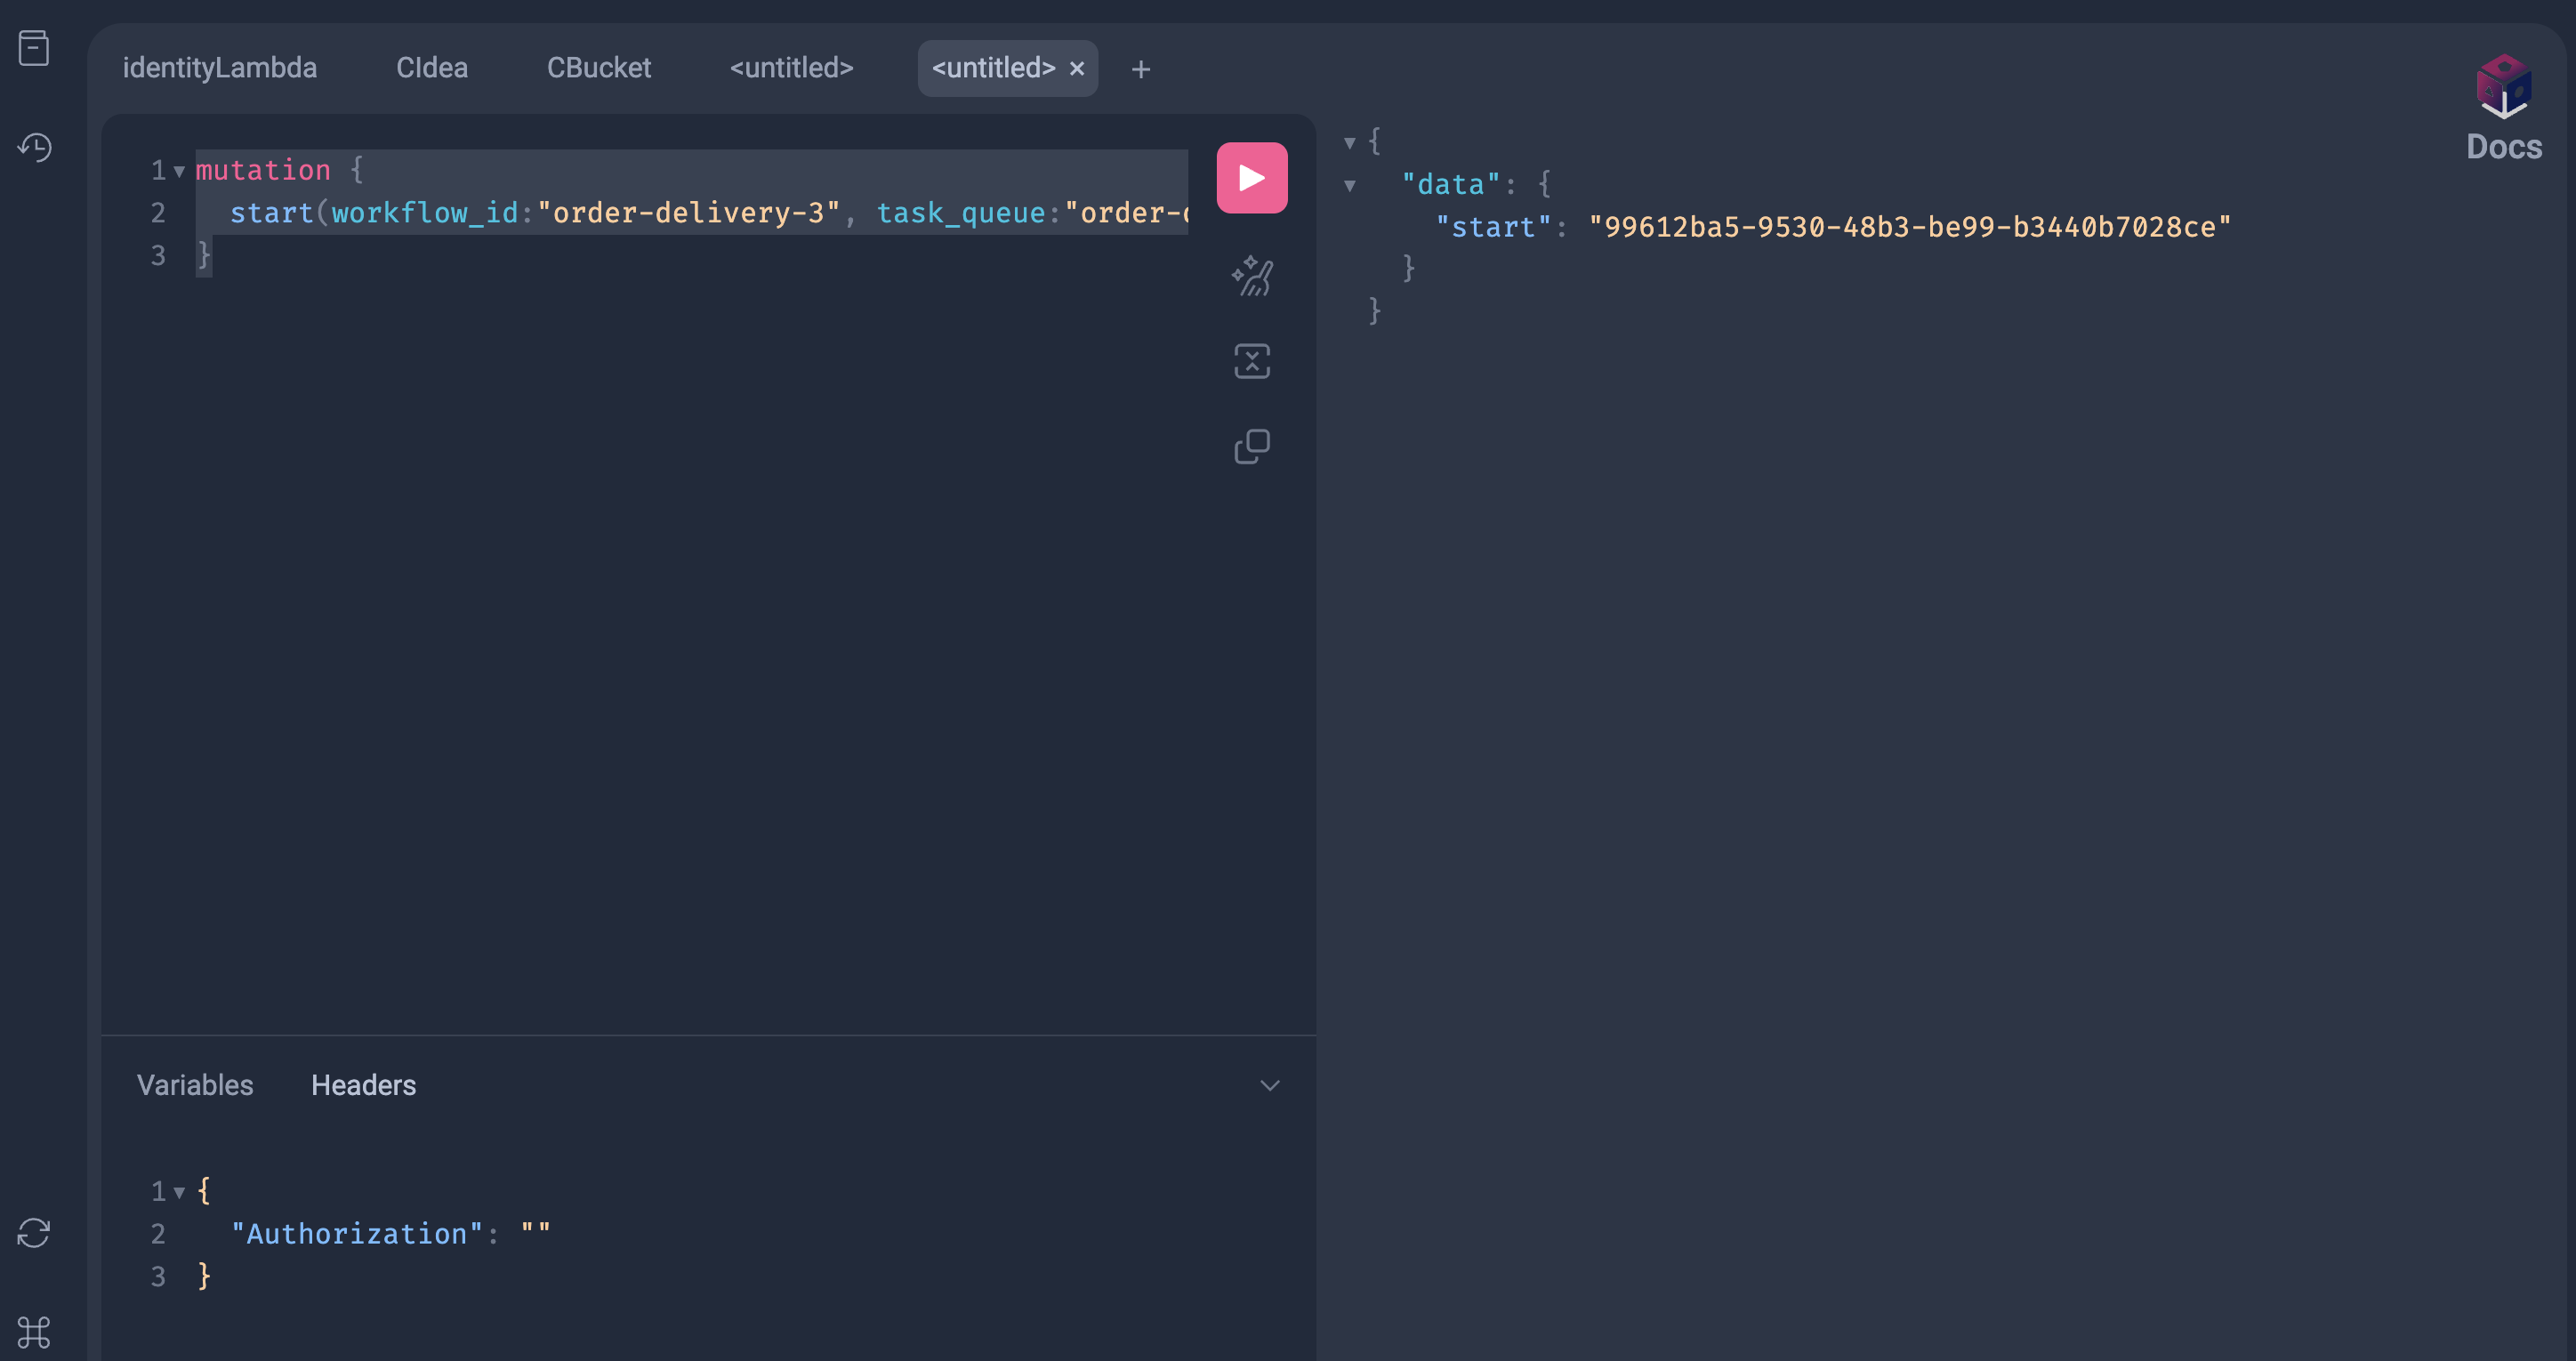
After completing the above steps, you can access the web GraphQL client of the typegate at http://localhost:7890/example. Run this query inside the client to start your workflow.
mutation {
  start(
    workflow_id: "order-delivery-3"
    task_queue: "order-delivery-queue"
    args: ["order12"]
  )
}
After a successful run, you will get the following result which includes the run_id of the workflow which has just been started.
You can also check the temporal web UI to monitor your workflows and you should see a result similar to this one.

You can explore the Temporal Runtime for more info.
This wraps up the blog, thanks for reading until the end :)