
Distributed execution flow paradigms

· 11 min read

In this age of cloud development and microservices architecture, problems start to arise with the increased workloads that run in the system. Imagine an e-commerce platform where a customer places an order for a product during a high-demand sale event. The order triggers a series of interconnected processes: payment processing, inventory checks, packaging, shipping, and final delivery. Each of these processes might be handled by different microservices, potentially running on different servers or even in different data centers. What happens if the payment service goes down right after the payment is authorized but before the inventory is updated? Or if the packaging service fails just after the inventory is deducted but before the item is packed? Without a robust mechanism to ensure that each step in the workflow completes successfully and that failures are properly handled, you could end up with unhappy customers, lost orders, and inventory discrepancies.

Having multiple components in your system introduces more failure points, which is a common phenomenon in complex systems. But one important behavior any application must ensure is that the execution flow reaches its completion. As systems grow in features and complexity, the likelihood of long-running processes increases. To ensure these processes complete as intended, several solutions have been introduced over the last few decades. Let's explore some of the solutions that have been proposed to achieve workflow completeness.

1. Event-Driven Architecture with Message Queues

This architecture relies heavily on services communicating by publishing and subscribing to events using message queues. Message queues are persistent storages that ensure data is not lost during failures or service unavailability. Components in a distributed system synchronize by using events/messages through these independent services. While this approach offers service decomposability and fault tolerance, it has some shortcomings. For example, using message queues comes with the overhead of managing messages (e.g., deduplication and message ordering). It also isn’t ideal for systems requiring immediate consistency across components. Some technologies and patterns that utilize this architecture include:

Fig. Event Driven Architecture with Message Queues - RabbitMQ

Advantages

  • Improved Scalability
  • Enhanced Responsiveness
  • Enhanced Fault Tolerance
  • Simplified Complex Workflows
  • Real-Time Data Processing

Challenges

  • Event Ordering
  • Data Consistency
  • Monitoring and Debugging
  • Event Deduplication

You can mitigate or reduce these challenges by following best practices like Event Sourcing, Idempotent Processing, CQRS (Command Query Responsibility Segregation), and Event Versioning.

2. The Saga Pattern

This design pattern aims to achieve consistency across different services in a distributed system by breaking complex transactions spanning multiple components into a series of local transactions. Each of these transactions triggers an event or message that starts the next transaction in the sequence. If any local transaction fails to complete, a series of compensating actions roll back the effects of preceding transactions. While the orchestration of local transactions can vary, the pattern aims to achieve consistency in a microservices-based system. Events are designed to be stored in durable storage systems or logs, providing a trail to reconstruct the system to a state after a failure. While the saga pattern is an effective way to ensure consistency, it can be challenging to implement timer/timeout-based workflows and to design and implement the compensating actions for local transactions.

Note: In the Saga pattern, a compensating transaction must be idempotent and retryable. These principles ensure that transactions can be managed without manual intervention.

Fig. The Saga Pattern for Order delivery system

Advantages

  • Ensures data consistency in a distributed system without tight coupling.
  • Provides Roll back if one of the operations in the sequence fails.

Drawbacks

  • Might be challenging to implement initially.
  • Hard to debug.
  • Compensating transactions don’t always work.

3. Stateful Orchestrators

Stateful orchestrators provide a solution for long-running workflows by maintaining the state of each step in a workflow. Each step in a workflow represents a task, and these tasks are represented as states inside workflows. Workflows are defined as state machines or directed acyclic graphs (DAGs). In this approach, an orchestrator handles task execution order, transitioning, handling retries, and maintaining state. In the event of a failure, the system can recover from the persisted state. Stateful orchestrators offer significant value in fault tolerance, consistency, and observability. It’s one of the solutions proven effective in modern distributed computing. Some well-known services that provide this solution include:

Advantages

  • High Resiliency: Stateful orchestrators provide high resiliency in case of outages, ensuring that workflows can continue from where they left off.
  • Data Persistence: They allow you to keep, review, or reference data from previous events, which is useful for long-running processes.
  • Extended Runtime: Stateful workflows can continue running for much longer than stateless workflows, making them suitable for complex and long-running tasks.

Challenges

  • Additional Complexity: They introduce additional complexity, requiring you to manage issues such as load balancing, CPU and memory usage, and networking.
  • Cost: With stateful workflows, you pay for the VMs that are running in the cluster, whereas with stateless workflows, you pay only for the actual compute resources consumed.

4. Durable Execution

Durable execution refers to the ability of a system to preserve the state of an application and persist execution despite failures or interruptions. Durable execution ensures that for every task, its inputs, outputs, call stack, and local variables are persisted. These constraints, or rather features, allow a system to automatically retry or continue running in the face of infrastructure or system failures, ultimately ensuring completion.

Durable execution isn’t a completely distinct solution from the ones listed above but rather incorporates some of their strengths while presenting a more comprehensive approach to achieving consistency, fault tolerance, data integrity, resilience for long-running processes, and observability.

Durable workflow engine - Temporal
Fig. Durable workflow engine

Advantages

  • Reduced Manual Intervention: Minimizes the need for human intervention by handling retries and failures programmatically.
  • Improved Observability: Provides a clear audit trail and visibility into the state of workflows, which aids in debugging and monitoring.
  • Scalability: Scales efficiently across distributed systems while maintaining workflow integrity.

Challenges

  • Resource Intensive: Persistent state storage and management can consume significant resources, especially in large-scale systems.
  • Latency: The need to persist state and handle retries can introduce latency in the execution flow.

As durable execution grows to be a fundamental driver of distributed computing, some of the solutions which use this architecture are

Among these, Temporal has grown in influence, used by companies like SnapChat, HashiCorp, Stripe, DoorDash, and DataDog. Its success is driven by its practical application in real-world scenarios and the expertise of its founders.

At Metatype, we recognize the value of durable execution and are committed to making it accessible. Our Temporal Runtime integrates seamlessly into our declarative API development platform, enabling users to harness the power of Temporal directly within Metatype. For those interested in exploring further, our documentation provides a detailed guide on getting started with Temporal Runtime.

Below is an example of how you can build a simple API to interact with an order delivery temporal workflow within Metatype.

note

If you are new to Metatype or haven’t set it up yet in your development environment. You can follow this guideline.

For this example, the order delivery system will have few components/services such as Payment, Inventory and Delivery.

Your temporal workflow definition should look similar to the one below.

Activities definition inside src/activities.ts:`
async function sleep(time: number) {
return new Promise((resolve) => {
setTimeout(resolve, time);
});
}

export async function processPayment(orderId: string): Promise<string> {
console.log(`Processing payment for order ${orderId}`);
// Simulate payment processing logic
await sleep(2);
return "Payment processed";
}

export async function checkInventory(orderId: string): Promise<string> {
console.log(`Checking inventory for order ${orderId}`);
// Simulate inventory check logic
await sleep(2);
return "Inventory available";
}

export async function deliverOrder(orderId: string): Promise<string> {
console.log(`Delivering order ${orderId}`);
// Simulate delivery logic
await sleep(5);
return "Order delivered";
}
Workflow definition inside src/workflows.ts:

export const { processPayment, checkInventory, deliverOrder } =
proxyActivities<{
processPayment(orderId: string): Promise<string>;
checkInventory(orderId: string): Promise<string>;
deliverOrder(orderId: string): Promise<string>;
}>({
startToCloseTimeout: "10 seconds",
});

export async function OrderWorkflow(orderId: string): Promise<string> {
const paymentResult = await processPayment(orderId);
const inventoryResult = await checkInventory(orderId);
const deliveryResult = await deliverOrder(orderId);
return `Order ${orderId} completed with results: ${paymentResult}, ${inventoryResult}, ${deliveryResult}`;
}
Worker definintion inside src/worker.ts:
import { NativeConnection, Worker } from "@temporalio/worker";
import * as activities from "./activities";
import { TASK_QUEUE_NAME } from "./shared";

async function run() {
const connection = await NativeConnection.connect({
address: "localhost:7233",
});

const worker = await Worker.create({
connection,
namespace: "default",
taskQueue: TASK_QUEUE_NAME,
workflowsPath: require.resolve("./workflows"),
activities,
});

await worker.run();
}

run().catch((err) => {
console.error(err);
process.exit(1);
});

After you have setup the above components, now you need a client to start of any OrderWorkflow. Here is where metatype comes in, through the simple APIs Temporal Runtime exposes, you can communicate with your temporal cluster. Down below is the workflow communication bridge for this system expressed within a typegraph which includes endpoints to start a new workflow and describe an existing one.

import { Policy, t, typegraph } from "@typegraph/sdk/index.ts";
import { TemporalRuntime } from "@typegraph/sdk/providers/temporal.ts";

typegraph(
{
name: "order_delivery",
},
(g: any) => {
const pub = Policy.public();

const temporal = new TemporalRuntime({
name: "order_delivery",
hostSecret: "HOST",
namespaceSecret: "NAMESPACE",
});

const workflow_id = "order-delivery-1";

const order_id = t.string();

g.expose(
{
start: temporal.startWorkflow("OrderWorkflow", order_id),
describe: workflow_id
? temporal.describeWorkflow().reduce({ workflow_id })
: temporal.describeWorkflow(),
},
pub,
);
},
);

You need to add the secrets HOST and NAMESPACE under your typegraph name inside the metatype.yaml file. These secrets are important to connect with your temporal cluster and can be safely stored in the config file as shown below.

metatype.yaml
typegate:
dev:
url: "http://localhost:7890"
username: admin
password: password
secrets:
example:
POSTGRES: "postgresql://postgres:password@postgres:5432/db"
MONGO: "mongodb://root:password@mongo:27017/db"
HOST: "http://localhost:7233"
NAMESPACE: "default"

You need to add only the last two lines as the others are auto-generated. Note that secrets are defined under the example parent, which is the name of your typegraph. If the name doesn't match, you will face secret not found issues when deploying your typegraph.

Before deploying the above typegraph, you need to start the temporal server and the worker. You need to have temporal installed on your machine.

Boot up temporal

Start the temporal server.

temporal server start-dev

Start the worker.

typescript npx ts-node src/worker.ts

After booting the temporal server, run the command down below to get a locally spinning typegate instance with your typegraph deployed.

meta dev

After completing the above steps, you can access the web GraphQL client of the typegate at http://localhost:7890/example. Run this query inside the client to start your workflow.

mutation {
start(
workflow_id: "order-delivery-3"
task_queue: "order-delivery-queue"
args: ["order12"]
)
}

After a successful run, you will get the following result which includes the run_id of the workflow which has just been started.

Query result

You can also check the temporal web UI to monitor your workflows and you should see a result similar to this one.

Workflows dashboard

You can explore the Temporal Runtime for more info.

This wraps up the blog, thanks for reading until the end :)

Python on WebAssembly: How?

· 12 min read

Metatype's different language runtimes are nice, but integrating one is an entire story. Let's discover how we managed to implement one for Python.

Why?

You have probably heard of "Function as a Service" or FaaS. In simple terms, FaaS are platforms that allow users to run code in response to events without the hassle of managing the underlying infrastructure. Users submit their programs and the platform takes care of the rest including, usually, scaling, availability, and configuration. AWS Lambda is one such example and FaaS as a whole are a popular implementation of the serverless model.

Metatype has this model at heart with applications composed of small functions that respond to events like http requests and authorization checks. This is achieved through runtimes like the DenoRuntime which implements a way to execute functions authored in Typescript using Web Workers as implemented by Deno (not based on Deno Deploy).

note

Metatype supports running multiple apps or typegraphs on a single deployed cluster but we're still in the kitchen on a hosted cloud solution. Subscribe to the blog or the Github repository for updates.

Implementing the DenoRuntime was a very straightforward affair as the Typegate (the engine at the heart of Metatype) is primarily written in Typescript and runs on a slightly modified version of the Deno runtime. What's more, JavaScript has single threaded and asynchronous semantics and the v8 engine that it commonly runs on is of very high-quality by all regards. These qualities lend themselves very well to the requirements of running a serverless platform like security (good sandboxing) and performance (low start-up latencies). This fact is reflected in the dominance of JavaScript in the serverless market though it doesn't hurt that it's also the most popular language in use today.

Another very popular language is Python; and its standard library can be quite resourceful for this type of use case. However, as we shall see, integrating the Python runtime isn't as simple as integrating Deno.

What are the requirements?

There are a number of Python runtimes available but a set of extra factors limit what we can achieve.

  1. Security: functions should have limited access to the execution environment. Python doesn't have built-in features for sandboxing out of the box unlike Deno.
  2. Speed: functions should run fast and with low latency. We're interested in metrics like cold-start latency and overhead of any cross process/system communication.
  3. User-friendliness: functionalities provided in any of the languages supported by Metatype should, within reason, mirror each other and maintain a degree of uniformity. We support inline code snippets and external file references for DenoRuntime and this should be the case for Python as well.
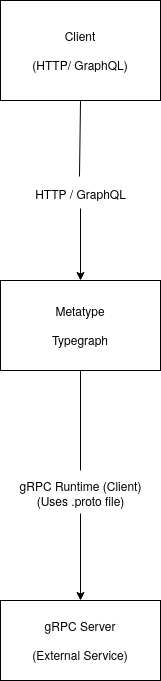
  4. Interoperability: functions running in Python will need to have access to other parts of the app running on the Typegate like being able to invoke other functions.

The Typegate is a TypeScript program with a bit of Rust sprinkled in. It runs as a traditional POSIX process. Think Linux containers. This fact renders multi-processing, one of the readily apparent approaches, undesirable as it would require investing is robust worker process management and distribution schemes. It'd be great if we could keep everything inside the Typegate process.

One solution that presents itself here is the PyO3 project which provide Rust bindings to different Python runtimes like CPython and PyPy. It'd not only allow us to run Python code in-process but it also provide an easy way to expose the functions written in Rust to Python and vice-versa. A good solution for the bidirectional communication needed for our interoperability requirements.

Unfortunately, PyO3 doesn't have any provisions for sandboxing which is critical for our use case. This is where WebAssembly enters into the picture. WebAssembly or Wasm for short is a executable bytecode format that originates from the web world and is designed for applications that run inside web-browsers. This use case shares most of our requirements and the Wasm world promises excellent sandboxing properties that should be perfect for our use case. We just have to find a way to run Python inside of it.

An aside on WASI

WebAssembly System Interface (WASI) is an additional spec for the bytecode format that formalizes how Wasm programs access their host environment. A lot like POSIX, this generally means OS capabilities such as file system access and networking but also, in it's latest iteration extends to any custom host defined functionality.

Wasm + WASI fits very well to our use case. As opposed to mutli-processing, we can instantiate, manage, and expose resources programmatically with ease. And as luck would have it, some community work has already been done at the time that led to wasm builds of CPython being available.

Unfortunately, the WASI spec itself is a work in progress. When we started out, only the limited "preview1" implementation was supported by most runtimes. preview1 only focused on a standard set of host functionalities much like a libc implementation. Well enough but any custom functionality meant having to rely on simple C ABI alike functions for intra-process communication. In order to make this work easier, we elected to bring PyO3 back into the picture so that all the IPC stuff is written in Rust, the language with the most support in the Wasm ecosystem today.

All in all, this would mean the python interpreter wrapped in a PyO3 based native API. An assembly that accepts user code as strings and then invokes them in response to events. All of this would be running inside a Wasm runtime, WasmEdge in this case, which ticks of all of the sandboxing and security requirements. This approach is well described as the Reactor pattern, a common pattern used in Wasm land.

FIRST SOLUTION

File system access

Since the PyO3 project doesn't support statically linking the Python runtime, we'll need to find a way dynamically link libpython. Thankfully, Wasm does support dynamic linking and wasm builds of libpython are available curtsy of the WebAssembly Language Runtimes project. Bringing all of this together isn't as simple though as PyO3's tries to load libpython from certain paths, a concept that isn't exactly clearly defined in Wasm's post POSIX webtopia.

Our first solution was to use wasi-vfs, a tool which allows you to embed a virtual file system, accessible through preview1 APIs, directly into your wasm binaries. This way, we could prepare a single wasm artifact that contains both the libpython build and the custom glue code.

This approach turned out to be quite hacky though and after encountering several issues, we ultimately decided to go with preopens. Preopens are another virtual file-system solution where you map an actual file-system directory to a virtual directory visible to a running Wasm instance. This means we'll need to prepare the libpython Wasm file on disk before running the instance but it was an acceptable solution. We also use preopens to provide some of the user submitted code to our custom python runtime.

The following rust snippet demonstrates the preopens looked like in use:

fn init_Python_vm() -> Result<Rt> {
let preopens = vec![
// User script will be uploaded at ./src/Python which is virtually seen as /app
// Each script has access only to /app
"/app:./src/Python:readonly".to_owned()
];

// This follow the same idea as above, but for clarity's sake we decided to separate it
let pylib = PathBuf::from("./vendor/libpython/usr/local/lib");

// This is our wasm module reponsible for running Python scripts at runtime
// It assumes /app and libpython to be available in its world
let wasi_mod = PathBuf::from("./build/Python-wasi-reactor.wasm");

// Now we can instantiate the WASI module with all the configurations above
let rt = instantiate_custom_python_runtime(preopens, pylib, wasi_mod)?;
rt.run_func(None, "init_Python", params!())?;

// ..

Ok(rt)
}

WASI 0.2

The solution described above worked well to an extent but the limitations of preview1 and all the wrangling with PyO3 resulted in complexity that we were always ready to get rid of. This was exactly what we did after the Bytecode Alliance finalized WASI 0.2 back in January 2024 and with it, a slew of new opportunuties.

WASI 0.2 introduces a whole new concept of components, wasm modules that come with pre-specifed interfaces using the Wit format and based on a whole new ABI to boot. These new capabilities suggest that it should possible to replace our PyO3 based glue code with the WASI based layer. Let's see how.

We first used the new found WASI powers to implement support for Wasm based functions through the WasmRuntime. This lead us to implement the wit_wire protocol, a simple JSON based WIT interface that'd be used by any wasm component that intenteds to run on the WasmRuntime. Simple enough that it's reproduced down below in it's entirety.

package metatype:wit-wire;

// what the host provides
interface typegate-wire {
hostcall: func(op-name: string, json: string) -> result<string, string>;
}

// what's expected from the guest
interface mat-wire {

// init function called when we first make the component
init: func(args: init-args) -> result<init-response, init-error>;
// general purpose event handler
handle: func(req: handle-req) -> result<json-str, handle-err>;

type json-str = string;

record init-args {
// the list of operations the application is expecting
// from this component
expected-ops: list<mat-info>
metatype-version: string,
}

record mat-info {
op-name: string,
mat-title: string,
mat-data-json: string,
}

record init-response {
ok: bool
}

variant init-error {
version-mismatch(string),
unexpected-mat(mat-info),
other(string)
}

record handle-req {
op-name: string,
in-json: json-str,
}

variant handle-err {
no-handler,
in-json-err(string),
handler-err(string),
}
}

// a world defines what interfaces get imported
// and exported
world wit-wire {
import typegate-wire;

export mat-wire;
}

Squint your eyes tight enough and the wit_wire protocol as implemented wasn't far off from what the PyO3 based glue code was doing in the previous implementation. Specifically, register a list of operations that the Typegate is expecting from the module and execute them for incoming event. We just need to add support for the operation metadata to contain extra items. In the case of the PythonRuntime, this would be the Python code itself.

Now that we have the wit_wire implementation taking care of bidirectional communication, we have little reason to keep the PyO3 based glue code around. This glue was doing a bit more than acting as a boundary though. It was also responsible for setting up the operating environment for the Python code. For example, we'd need some kind of initialization to execute the user's Python snippets which are in free standing lambda form. How does one create components out of Python anyways?

componentize-py is a tool authored by the Bytecode Alliance that allows you to produce WASI components that are authored in Python. It has code generation suite that emits guest bindings in Python for any WIT specification you feed it. It then takes your Python code written against these bindings and embeds them in a Wasm build of the Python interpreter to produce a component that supports the specified Wit.

Unsurprisingly, componentize-py relies on PyO3 and preopens itself in addition to component-init, a solution to pre-intialize components up to a certain point for improved startup latencies. This pre-intialization means we won't need to provide the actual preopens for the resulting component, baking the libpython object code directly into it as PyO3 will have dynamically loaded the object code by that point. Ultimately, this allows us to write all of our glue code in Python itself.

We still need a bit of Rust to support the wit_wire interface on the Typegate but this implementation is general across both the PythonRuntime and WasmRuntime. We'd also moved to the Wasmtime, also by Bytecode Alliance, for our wasm workloads at this point and their Rust bindings are a pleasure to use. It's all smooth sailing from here.

Cloudy skies?

A final stumbling block for this approach was the many seconds Wasmtime spends cooking all your CPU cores when it compiles the fat wasm module that contains the Python interpreter, Pyo3 bindings and more. This happens because Wasmtime does't (yet) implement any schemes for tiered compilation, all code being greeted by their optimizing compiler, Cranelift. And optimizations take time. Sure, you only pay this cost the first time you load the Python runtime module as Wasmtime has great support for caching including on-disk caching. But, 10+ second cold-starts, as measured on one developer's machine, are unacceptable in a system that primarily serves HTTP requests. What to do?

Wasmtime has just the feature for this problem, pre-compilation. Ahead-of-time compilation of wasm bytecode into a native instruction set. Such files are commonly given the .cwasm extesion, c for compiled, and they are not a standalone executable but inteded to be run within Wasmtime's sandbox. This eliminates the compliation cost but the semantics of the source wasm bytecode and the runtime safe-guards means that this should be just as safe as JITting it (just-in-time compilation). We then statically embed this pre-compiled wasm artifact, after compressing it, in the Typegate binary removing the need for sidecar files while ensuring minimal cold-starts for our python workloads. To be concrete, this means roughly around 200 ms of overhead for a cold function and 5 ms for a warm one. Good enough.

This post describes the technical journey we took to arrive to the current implementation of the PythonRuntime. Hopefully, all details were clear enough and please direct any feedback, questions, and thoughts to the comments down below and our Github issues/discussion board.

Programmatic deployment (v0.4.x)

· 4 min read

A new approach to deploying typegraphs has been introduced starting with version 0.4.0. This aims to facilitate the development of automation tools around the APIs you build within the Metatype ecosystem.

What has changed?

Before v0.4.x, we had to entirely rely on the meta cli to deploy typegraphs to a typegate instance.

This is no longer the case, as all core logic has been moved to the TypeScript/Python typegraph SDKs, both of which share the same WebAssembly-based typegraph-core behind the scenes. This provides some degree of assurance that you will have nearly identical experiences with each SDK.

What are the use-cases?

Since typegraphs can be written using the programming language your preferred SDK is based on, you can dynamically create typegraphs with ease.

The missing piece was having an interface natively backed inside the SDK for doing deployment programmatically.

Programmatic deployment

Initial setup

Just like any other dependency in your favorite programming language, each SDKs can be installed with your favorite package manager.

You can use one of the commands below to get started with the latest available version.

To upgrade the Typescript SDK of the typegraph package, you can use one of the following commands:

  • Node
npm update @typegraph/sdk
  • Deno
deno cache --reload "npm:@typegraph/sdk"

Configuration

This is analoguous to the yaml configuration file when you are using meta cli.

It's the place where you tell which typegate you want to deploy to, how you want the artifacts to be resolved, among other settings.

const config = {
typegate: {
url: "<TYPEGATE_URL>",
auth: new BasicAuth("<USERNAME>", "<PASSWORD>"),
},
typegraphPath: path.join(cwd, "path-to-typegraph.ts"),
prefix: "",
secrets: { POSTGRES: "<DB_URL>" },
migrationsDir: path.join("prisma-migrations", tg.name),
defaultMigrationAction: {
create: true,
reset: true, // allow destructive migrations
},
};

Deploy/remove

Now, picture this, you have a lot of typegraphs and one or more typegate instance(s) running, you can easily make small scripts that does any specific job you want.

// ..
import { tgDeploy, tgRemove } from "@typegraph/sdk/tg_deploy.js";
// ..

const BASIC_AUTH = loadMyAuthsFromSomeSource();
const TYPEGATE_URL = "...";

export async function getTypegraphs() {
// Suppose we have these typegraphs..
// Let's enumerate them like this to simplify
return [
{
tg: await import("path/to/shop-finances"),
location: "path/to/shop-finances.ts",
},
{
tg: await import("path/to/shop-stats"),
location: "path/to/shop-stats.ts",
},
];
}

export function getConfig(tgName: string, tgLocation: string) {
// Note: You can always develop various ways of constructing the configuration,
// like loading it from a file.
return {
typegate: {
url: "<TYPEGATE_URL>",
auth: new BasicAuth("<USERNAME>", "<PASSWORD>"),
},
typegraphPath: path.join(cwd, "path-to-typegraph.ts"),
prefix: "",
secrets: { POSTGRES: "<DB_URL>" },
migrationsDir: path.join("prisma-migrations", tg.name),
defaultMigrationAction: {
create: true,
reset: true, // allow destructive migrations
},
};
}

export async function deployAll() {
const typegraphs = await getTypegraphs();
for (const { tg, location } of typegraphs) {
try {
const config = getConfig(tg.name, location);
// use tgDeploy to deploy typegraphs, it will contain the response from typegate
const { typegate } = await tgDeploy(tg, config);
const selection = typegate?.data?.addTypegraph;
if (selection) {
const { messages } = selection;
console.log(messages.map(({ text }) => text).join("\n"));
} else {
throw new Error(JSON.stringify(typegate));
}
} catch (e) {
console.error("[!] Failed deploying", tg.name);
console.error(e);
}
}
}

export async function undeployAll() {
const typegraphs = await getTypegraphs();
for (const { tg } of typegraphs) {
try {
// use tgRemove to remove typegraphs
const { typegate } = await tgRemove("<TYPEGRAPH_NAME>", {
baseUrl: TYPEGATE_URL,
auth: BASIC_AUTH,
});
console.log(typegate);
} catch (e) {
console.error("Failed removing", tg.name);
console.error(e);
}
}
}

Going beyond

With these new additions, you can automate virtually anything programmatically on the typegraph side. Starting from having highly dynamic APIs to providing ways to deploy and configure them, you can even build a custom framework around the ecosystem!

Please tell us what you think and report any issues you found on Github.

Notes

You can check the Programmatic deployment reference page for more information.

The Node/Deno SDK is now available

· 2 min read

We are happy to announce that we have redesigned our SDKs to support Node/Deno and facilitate the integration of future languages. Most of the typegraph SDK is now written in Rust and shaped around a core interface running in WebAssembly.

Meet wit

In the realm of WebAssembly, the wit-bindgen project emerges as the most mature tool to create and maintain the language bindings for WebAssembly modules. This tool introduces WIT (WebAssembly Interface Types) as an Interface Definition Language (IDL) to describe the imports, exports, and capabilities of WebAssembly components seamlessly.

For example, Metatype implements the reactor pattern to handle requests as they come and delegate part of their execution in correct WASM runtime. The wit-bindgen helps there to define the interfaces between the guest (the Metatype runtime) and the host (the typegate) to ensure the correct serialization of the payloads. The wit definition could look like this:

package metatype:wit-wire;

interface typegate-wire {
hostcall: func(op-name: string, json: string) -> result<string, string>;
}

interface mat-wire {
record handle-req {
op-name: string,
in-json: string,
}

handle: func(req: handle-req) -> result<string, string>;
}

world wit-wire {
import typegate-wire;

export mat-wire;
}

The wit file is then used to generate the bindings for the host and the guest in Rust, TypeScript, Python, and other languages. The host bindings are used in the typegate to call the WASM runtime, and the guest bindings are used in the WASM runtime to call the typegate.

Install the v0.2.x series

The documentation contains now examples for Node and Deno.

Upgrade with Node

npm install @typegraph/sdk
meta new --template node .

Upgrade with Deno

meta new --template deno .
import { typegraph } from "npm:@typegraph/sdk/index.js";

Upgrade with Python

pip3 install --upgrade typegraph
poetry add typegraph@latest

Give us feedback!

This new release enables us to provide a consistent experience across all languages and reduce the work to maintain the existing Python SDK.

As always, report issues and let us know what you think on GitHub.

Programmable glue for developers

· 2 min read

We are introducing Metatype, a new project that allows developers to build modular and strongly typed APIs using typegraph as a programmable glue.

What is Metatype?

Metatype is an open source platform to author and deploy APIs for the cloud and components eras. It provides a declarative programming model that helps you to efficiently design APIs and focus on the functional requirements.

The runtime embraces WebAssembly (WASM) as a first-class citizen to allow you to write your business logic in the language of your choice and run it on-demand. Those "backend components" are reusable across your stacks and deployable without pipelines or containers.

The platform provides a set of capabilities out of the box:

  • create/read/update/delete data in your database
  • storing files in your cloud storage
  • authenticate users with different providers or using JWTs
  • connecting to third-party/internal APIs

And offers an opportunity to climb the one step higher in the abstraction ladder and drastically simplify the building of great APIs and systems!


Metatype is designed to be as simple as possible and horizontally scalable in existing container orchestration solution like Kubernetes. It consists of multiple parts, including:

  • Typegraph: a cross-language SDK to manage typegraphs - virtual graphs of types - and compose them
  • Typegate: a serverless GraphQL/REST gateway to execute queries over typegraphs
  • Meta CLI: a command-line tool to efficiently deploy the typegraphs on the gateway

What are virtual graphs?

Typegraphs are a declarative way to expose all APIs, storage and business logic of your stack as a single graph. They take inspiration from domain-driven design principles and in the idea that the relation between of the data is as important as data itself, even though they might be in different locations or shapes.

Loading...

These elements can then be combined and composed together similarly on how you would compose web components to create an interface in modern frontend practices. This allows developers to build modular and strongly typed APIs using typegraph as a programmable glue.

Where does this belong in the tech landscape?

Before Metatype, there was a gap in the technological landscape for a solution that specifically addressed the transactional, short-lived use cases. While there were existing tools for analytical or long-running use cases, such as Trino and Temporal, there was no generic engine for handling transactional, short-lived tasks.

← individual entities
transactional
large data →
analytical
instantaneous ↑
short-lived
Metatype
composition engine for entities in evolving systems
Trino
query engine for large data from multiples sources
long-running
asynchronous ↓
Temporal
workflow orchestration for long-running operations
Spark
batch/streaming engine for large data processing

Give it a try!

Let us know what you think! Metatype is open source and we welcome any feedback or contributions. The community primarily lives on GitHub.

Next steps

Emulating your server nodes locally

· 4 min read

Metatype is a platform which allows developers to solely focus on functional aspect of their applications by powering them with rich declarative API development tools to program and deploy in a cloud first environment. One component of Metatype is the Typegate, a serverless GraphQL/REST gateway for processing queries. This post is about how we in metatype made a dev friendly access to a typegate instance namely Embedded Typegate.

Introducing the Embedded Typegate

The embedded typegate is a feature that comes with the Meta CLI which provides the option of spinning a typegate instance from the CLI with minimum configurations and installations needed from the developer. All that is required to access the Embedded Typegate is to install Meta CLI. The spawned typegate instance behaves similarly to cloud-deployed typegates.

The motive

There are more than a couple of reasons why a developer would be tempted to use an emedded typegate. While developers can start a typegate instance using docker compose, the developer needs to install docker as a dependency to run the typegate container. Even though docker is familiar among many developers, it can sometimes be tricky and unbeknownst to some developers. We at metatype highly value the developer experience and one reason for adding the embedded typegate feature to the Meta CLI is for users to have a smooth experience with our system by providing a docker compose free experience. This feature provides a great utility for developers to author and test typegraphs in their local machine before deploying them to production level typegate instances on the cloud. Additionally, developers need not concern themselves with deployment configurations which are needed only during deployment. The only need to focus their energy and time in developing the right application and easily test them on embedded typegate running from the terminal. To add more to what is said, as the typegate engine keeps evolving, users will be abstracted away from the different configurations which might be added on the future. The Meta CLI will abstract much of what's not needed in a dev environment. Thus, leaving less headaches to developers on new changes. Ultimately, The embedded typegate is designed to be a good dev environment friendly tool which faciliates development time.

Quick First hand example

Install the v0.3.x series

Either of the two Typegraph SDKs are needed to author typegraphs. For this example, the node SDK will be used.

First, make sure the Meta CLI is installed.

curl -fsSL https://raw.githubusercontent.com/metatypedev/metatype/main/installer.sh | bash

Next, create a new node project using this command.

meta new --template node

The above command will create a sample typegraph which you can use to test the embedded typegate.

Now, you need to install the typegraph SDK by running the command down below. The previous command generates a package.json with the SDK specified as a dependency.

npm install

Before deploying the typegraph to the embedded typegate, Run the following commands below.

meta dev

Now that there is running instance of a typegate, you can deploy the example typegraph. From another terminal, run the command below.

meta deploy -f api/example.ts --allow-dirty --create-migration --target dev --gate http://localhost:7890

The typegate runs on port 7890 by default. If you access http://localhost:7890/example on your browser, you can see an GraphQL interface to interact with the deployed typegraph. You can test the example typegraph using the following graphql query below.

query {
multilpy(first: 3, second: 5)
}

Upgrade your Metatype development environment

To Upgrade the Meta CLI to the latest version, you can run the following command below.

meta upgrade

To upgrade the Typescript SDK of the typegraph package, you can use one of the following commands:

  • Node
npm update @typegraph/sdk
  • Deno
deno cache --reload "npm:@typegraph/sdk"

Learn more about Metatype

Wanna dive deep into the basics of Metaype? check our interactive tutorial revolving around the core features of the system.